Friends, we are in the homestretch here! Those of you who follow me on Instagram got a little sneak peak yesterday at something that is starting to resemble jeans.


This photo is of the area where the two inseams come together through the curve. I always push the seam allowances in opposite directions so that I am not sewing through 6 layers of material at this juncture. I like to put my pin straight down through the two inseams so that when they are sewn they will line up nicely.


Hopefully the outside of your crotch curve seam looks something like this. If you are new to sewing and your seams are off by a 1/4 inch or so, don't beat yourself up over it. My best advice is that you have to think about lining things up where the seam allowance is instead of at the edge of the fabric. Does that make sense? Remember too, hopefully no one is going to be getting down and inspecting your crotch curve seam. So unless you sit in a very un-ladylike manner, no one will ever see this seam.
Serger Sewists - IF that is a big capital IF, you are really comfortable with your serger this is a great seam to sew with it. I would personally fold the mock fly back and start sewing at the start of the crotch curve that meets with the mock fly, and sew out to the yoke end. Then, I would flip my garment and sew from where the mock fly meets the crotch curve up to the waist. Unless you have mad serger skills, I WOULD NOT attempt to sew this as one long seam. Only you know your limits, and you could mock this seam up on some practice fabric and see how you do. Just remember once the knife cuts the fabric, there is no going back.
Now on to the mock fly. The first thing that we want to do is mark the sewing line from the waist to the end of the fly curve. You want this line to be parallel to the straight edge of the mock fly and to join to the stitch line for the rest of the crotch curve.

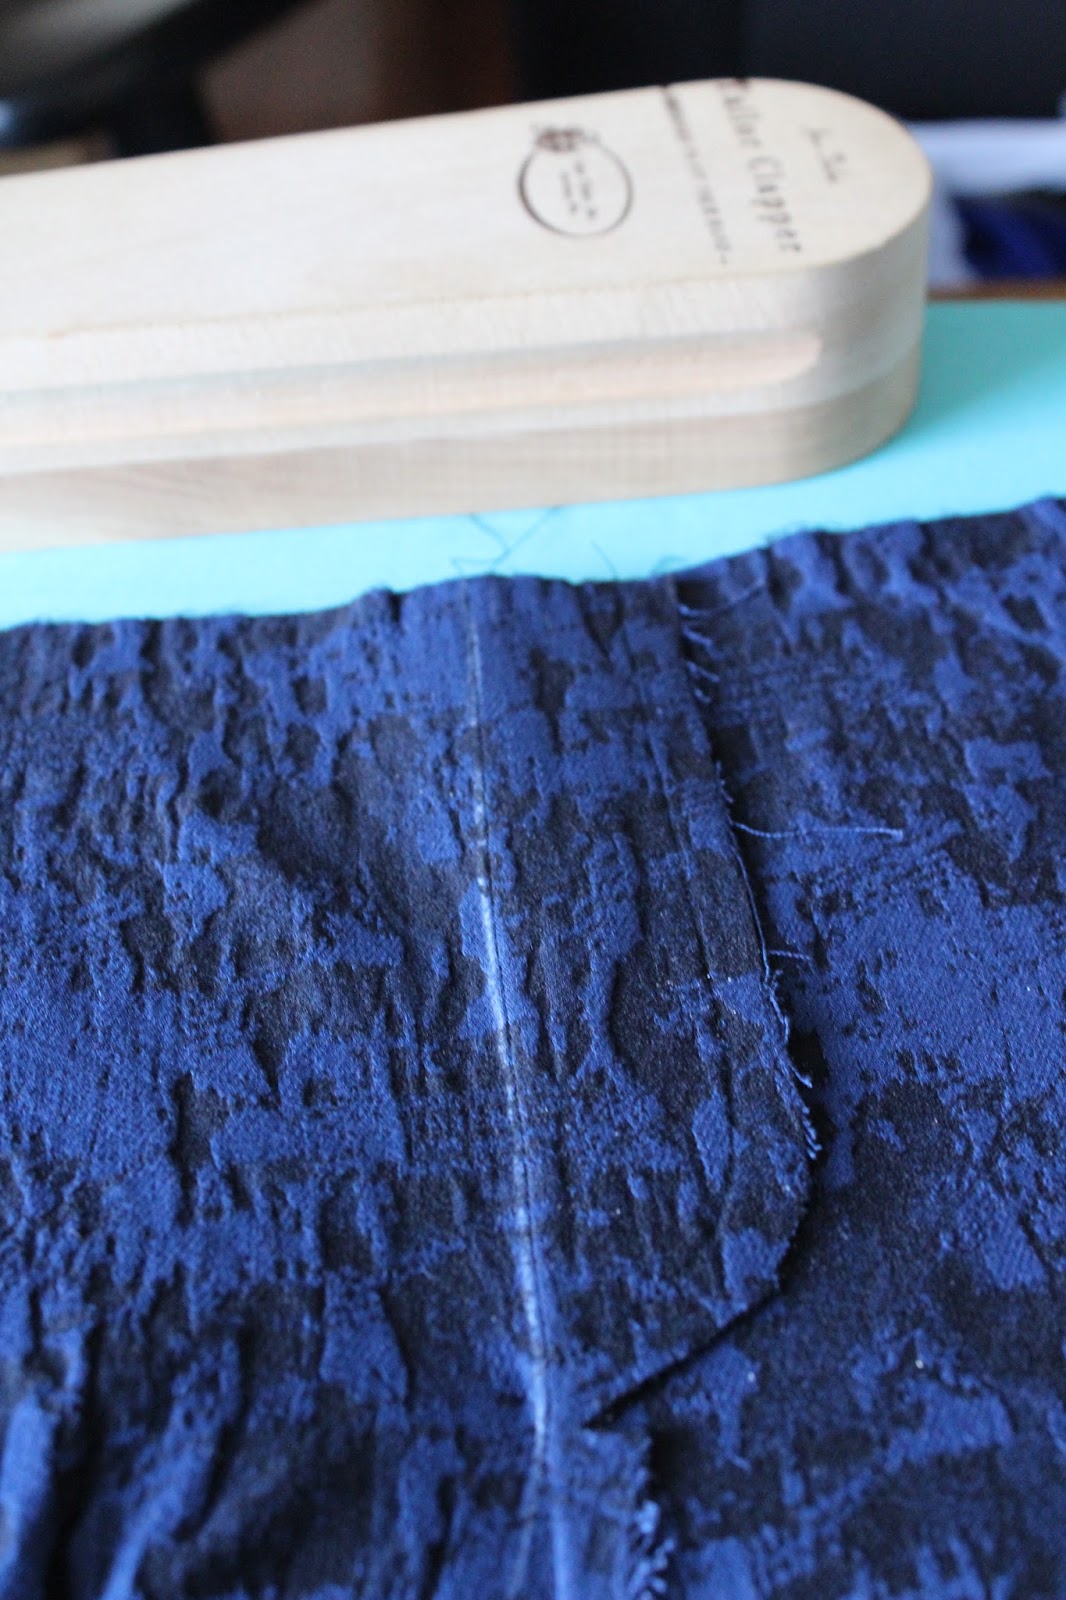
A good ruler and tailor's chalk are important tools for sewing. A box of multi color tailor's chalk is relatively inexpensive and will last you for a very long time!


Today we are sewing the crotch curve and mock fly. I don't really like that word crotch, but I can't really call it the lady business curve, or the down there curve. Can I?
Our first order of business is to pin the crotch curve together. What that means, is we want to take the two pieces that we now have, and pin them together at the seam that goes around the crotch. This also encompasses the mock fly area.

Starting at the mock fly begin placing your pins through your two garment pieces. As you can see in the picture above I made a little boo boo while I was cutting my fabric. Fortunately, this nick in to the seam allowance is more shallow than the actual seam allowance. Otherwise, I would have had to re-cut these pieces.

As we pin our way around the curve, we want to make sure that all of our notches are aligned. I like to put pins at each of the notch points, or in the case of a double notch like the one above, I will just pin in between the two notches.
Can I just talk about something off topic for a sec? In every photo of my thumb, it looks like I have a dirty thumb nail. I don't. I don't know why it looks this way either, except that I have really deep nail beds that have a very dark red line between the pink and the white part of my nail. But the rest of my nails don't seem to look that way. Anyway, I just wanted to say something about it, because it really bothers me.

This photo is of the area where the two inseams come together through the curve. I always push the seam allowances in opposite directions so that I am not sewing through 6 layers of material at this juncture. I like to put my pin straight down through the two inseams so that when they are sewn they will line up nicely.

I forgot to take an up close shot, but I also made sure that the seam of the yoke lined up evenly so that it will match after sewing these two pieces together.
At this point we are ready to sew this seam. You are going to want to use your lightning bolt stitch here because this is probably the most stretchy seam of the entire sew. This seam is sewn with a 3/8 inch seam allowance. If you are like me and have paranoia about only having one line of stitching holding your arse in, go ahead and sew a second row of stitching at the 1/4 inch line of the seam allowance.
Once you have finished your yoke should look something like this.

Now can you read the word that is printed on this fabric? Friends, I am going to have the word WASH all over my arse. I have mixed emotions about this! Thing is, you really and truly don't see it in the print, but the camera lens picks it up like crazy!

Serger Sewists - IF that is a big capital IF, you are really comfortable with your serger this is a great seam to sew with it. I would personally fold the mock fly back and start sewing at the start of the crotch curve that meets with the mock fly, and sew out to the yoke end. Then, I would flip my garment and sew from where the mock fly meets the crotch curve up to the waist. Unless you have mad serger skills, I WOULD NOT attempt to sew this as one long seam. Only you know your limits, and you could mock this seam up on some practice fabric and see how you do. Just remember once the knife cuts the fabric, there is no going back.
Now on to the mock fly. The first thing that we want to do is mark the sewing line from the waist to the end of the fly curve. You want this line to be parallel to the straight edge of the mock fly and to join to the stitch line for the rest of the crotch curve.

A good ruler and tailor's chalk are important tools for sewing. A box of multi color tailor's chalk is relatively inexpensive and will last you for a very long time!

Once you have your line drawn, go ahead and pin the fly area together. You don't want your fabric to shift while you are sewing this line.

Now, sew a straight line ending a few stitches in to where your chalk line meets the crotch curve. I used a straight stitch here, because these stitches are not going in the direction of the stretch of my fabric. I used a 2.5 stitch length, because I wanted a tighter/smaller stitch for this application.

Hopefully, in the picture above you can see that the stitching ends a few stitches in to the crotch curve seam.

Now, with our mock fly spread open with the right side of the garment facing down, we want to press the mock fly towards the right.

Again, using our clapper here will help get a nice crisp seam, so if you have one, use it. If you don't have one, might I suggest a heavy book.
Once the mock fly is pressed flat it will look something like this. Is your fabric fraying like mine is?

When we flip the fabric over to the other side (the right side), you should have a crisp seam.

So that we know where to stitch, you want to feel the edge of your mock fly through the fabric, and then use your chalk to mark along the edge.
Now let's put our double needle back in to our sewing machine. The instructions did not call for a double needle here, but I like the continuity of it, and I like the way the double needle is going to catch the edge of the raw fabric.

I didn't pin the beginning of the seam here, but I did want to throw a couple of pins in to the curve, because that is where the fabric is most likely to shift. I placed the stitch/chalk line, just to the right of my left twin needle.

Remember to stitch forward and back to anchor the seam, and then go ahead and sew all the way to edge of the mock fly, also ending with a reverse and forward stitch. It may take a little practice to end your stitching right at the edge of the fly seam. Don't worry about it. Again, who is going to be down there inspecting your sewing prowess?

This is what the finished mock fly will look like from the front. If you wanted to make this look even more like a real fly, you could add some top stitching down the straight seam of the fly, and even a bar tack. Those are all design details you can decide about on your own.

This is what the back side of the mock fly looks like when sewn with the twin needle. See how the raw edge is encased between the two rows of stitches? That is why I chose to use the twin needle and used the alignment that I chose with the stitch/chalk line and the left needle. Does it all make sense now?
That is all for this step, Friends. I can't believe that this project is almost finished, can you? Don't worry if you are running behind, because obviously I am too! You are going to have until November 15th to get your Misty Jeans made if you want to try to get in on the prize action.
Up Next: Sewing the Side Seams
Thanks for all the info, Alicia! I haven't even started yet. lol
ReplyDeleteThanks, Andie! You have only had a FEW things going on. You will get around to it eventually!
DeleteI am really enjoying these tutorials. My fear of attempting jeans is a non issue now.
ReplyDeleteRobin, I am so happy that you are finding these tutorials helpful. You can make pants, I know you can!
DeleteSad face here. Following this step I decided to baste the side seam to see how they fit. They looked small...and were too small. I couldn't even pull them up past my knee. Anyone else have this problem?
ReplyDeleteMarie and Chris, (I am assuming this is Marie) the general feedback that I have been getting is that these are running big for everyone. Would you mind telling me if you used the PDF or the paper pattern? Also, what size are you? What percentage of stretch is your fabric? You can send me an email if you need don't want to put these details out there. pandorasews at gmail dot com I want to help figure out what went wrong.
DeleteStill love that fabric and am really enjoying this sew-along. Thanks for all the detailed information. It is really useful. Xx
ReplyDeleteThanks, MoR! I really am liking the fabric too. It's from fabric.com.
DeleteI can't see the word even now that you told me what it says! I can see where the letters probably are, but the word is not popping out at me. Hopefully they won't show when you are wearing them. I finally started the actual sewing this morning! I had made alterations to the pattern, then I got a new sewing machine, so I made a bunch of samples of top stitching and various stitches for my pockets. I finally had to make myself get up the nerve to really start the pants!
ReplyDeleteMaggie, please let me know how it goes! If I can help at all along the way, don't hesitate to contact me. Also, YAY to getting a new sewing machine!
Delete