Showing posts with label Curvy Sewing. Show all posts

Monday, May 16, 2016

It's Alive!

Hello, Friends!  After a rash of emails and comments I figured I had better touch base to let you all know that I am alright.  So much is going on that my head has been spinning for the last couple months.  Where to start?

Those of you who follow me on Instagram know that I have been doing some sewing, but certainly not up to my normal level of productiveness.   Here are some of the things that I have sewn lately:


This is McCall's M5640.  I sewed the pattern in a lovely multicolor cotton voile that is so soft and cool.  This is going to be my go to Summer pajama pattern.


This is a modified version of McCall's M5640 that I made for my Mother-in-Law for Mother's day.  She loves wearing snap front dusters over her night clothes, so I decided to make her a pretty one.  The picture here really doesn't do the fabric justice.


This top is McCall's M6960.  I have been wanting to sew this pattern for a while.  Though I am not one to fear showing my cleavage this one went a little too low even for me, so I sewed in a piece of lace as a modesty panel, and have adjusted the neckline on the pattern, because I will be making this one again.


This final top is McCall's M6970 in a seersucker fabric that I had purchased from Hancock as they were going out of business.  I had a really hard time deciding how to center the stripes on this top.  I love the v notch in the neckline though and am really pleased with how this creation turned out.

In addition to these items, I have also sewn myself some self drafted chambray shorts that I intend to live in over the coming warmer months.

In the midst of all this sewing I decided to make myself a bathing suit.  I went with making Butterick  B5795.  That turned in to a wadder very quickly.  The bridge (area between the twins) of this pattern was a full 4 inches wide.  Who has that much space between their boobs?  I certainly don't!


I was actually rocking along quite well with my sewing and then this happened two days before we left for vacation (and five minutes before the listing agent for our house was set to arrive).


When you have hyper-mobile joints, these kinds of things seem to happen to you at the most inopportune time.  Not that there is exactly an opportune time to rupture a ligament.  I spent most of my vacation rolling around on a knee walker.  But hey, vacation is vacation and a little thing like a busted ankle wasn't going to hold me down!

In other news our house goes on the market any day now, and we will soon be heading to Tennessee where my husband will start a new job next week.  My son and I will join him once school is out for the Summer.  Unfortunately, that means that I probably will not be sewing for a few months.  We will be in temporary housing through July 31st.  On top of that my precious sewing room has been turned in to an office for staging the house, and my sewing stuff will be in storage until we purchase and move in to a house in Tennessee.

Now, that I have gotten you all caught up on what has been happening here, I just also want to say that I am sorry for disappearing on you all.  I haven't been commenting on other blogs.  I have had invitations to collaborate that I have had to turn down, and I feel like I have been an all around awful bloggy friend.  To my dear friend Andie...I know it has been forever.  I will not leave for Tennessee without rectifying the situation.

So, friends are any of you in Tennessee?  I am looking forward to being close to Sir's Fabric!  I always wanted to go there when I lived in Huntsville but never had a reason to go.  Any fabric stores in Central Tennessee that I should be aware of?  I am a ball of nerves and excitement and happiness and jitters, for this new adventure.  That said, I can't wait to get settled and get reconnected with all my friends here in the sewing community, too!

Sunday, November 15, 2015

Misty Pull-On Jeans Sewalong Parade of Jeans

Friends, here is the moment you all have been waiting for (maybe)!  The Misty Pull-On Jeans Link Party is open for business.

The Details:  You can begin posting at any time.  You are welcome to post as many pair of Misty Jeans as you are willing to make.  You can post pictures until the end of the day (EDT) on November 30th, 2015.  Then the voting begins.  Voting will continue until days end (EDT) December 10th, 2015.  The winner will receive a prize packet including a $50 fabric.com gift certificate, and 3 patterns of your choice from Style Arc.  More prizes may be added as the contest continues.  Good luck, and let's see those jeans!

One more thing...please head over to the Curvy Sewing Collective and post your Misty Jean Photos on their flickr group.  Nothing would make me happier than seeing lots of jeans on the CSC, so that we can help other women overcome their fear of sewing pants!


Monday, November 9, 2015

The Finished Product - Style Arc Misty Pull-On Jeans Sewalong

Friends, I am so glad to be finally posting this post!


Style Arc Misty Pull-On Jeans - Plus Size Edition


I want you all to know that I have not made any alterations to the pattern in these pictures.  This is how the jeans sewed up straight from the package (although I did size down 2 sizes).  You can see the wrinkling across the knees is still there.


Style Arc Misty Pull-On Jeans from the back


I feel pretty alright about the fit through the behind.  My sweet husband didn't notice that the building had left dust all over my back, so if you can, please ignore it.


Style Arc Misty Pull-On Jeans Knock Knee Adjustment Needed


I am not mad at the fit here in the front.  It is just as good as RTW if not a little better.  I knew going in that I need a knock-knee adjustment, but I really wanted to sew for the sewalong straight from the pattern.  I think it can be intimidating for beginners when we do a sewalong and then start making all kinds of adjustments.  I just wanted to show what you get (or should I say what I get?) without any changes.  I just want to be clear on that.

I didn't photograph the tummy area of the jeans.  Be mad at me if you want.  The fit there is pretty good.  I will be lengthening the front crotch curve a little in the future, but that is the only adjustment I will be making.  The elastic ended up coming in about an inch below my natural waist.


Style Arc Misty Pull-On Jeans Sway Back Adjustment Needed


Those smile lines at the bottom of my bum are the only issue with the fit of the back of the jeans for me.  This indicates that I need a pants swayback adjustment.  Just a minor one though.  Look at that pattern matching!  Not only did they match up from side to side, but the pattern continues on through the yoke.  Boy is my elbow sore from patting myself on the back!  My pockets have disappeared in to the fabric.

Now, with the pictures out of the way, let's just talk about these pants for a minute.  These pants are comfortable.  I imagine that these feel the way those pajama jeans from TV informercials felt.  Some of that may be the fabric I chose to use, but I have heard that same sentiment from other sewists as well.   What isn't comfortable about them is that exposed elastic waist, but in all fairness I have never liked the feel of elastic against my skin.  I will be going back and removing the elastic and encasing it with the jeans fabric.  When I make these in the future, I will only make them with encased elastic.  I do believe that I will make more of these in the future, but with all the necessary adjustments.

Let's talk about how you can get in on the fun of the Misty Jeans Sewalong.  If you search #mistyjeanssewalong on Instagram, you can see where some sewist are having discussions and posting pictures of their Misty Jeans.  Please feel free to join the conversation!

On Sunday, November 15th I am going to post a link party that you all can link your Misty Jeans to after you make them.  You will be able to post pictures of your Misty Jeans from any online picture posting source (flickr, Google Photos, etc.) as well as from your blog if you have one.  The link party will stay open for posts through November 30th.  Then, we will start live voting for the jeans on December 1st.  I can't quite tell you about the prize pack yet, but promise I will have all the details up in the link party.

So tell me friends, how are you doing on your Misty Jeans?  

Thursday, October 22, 2015

Sewing the Crotch Curve and Mock Fly - Style Arc Misty Pull-On Jeans Sewalong

Friends, we are in the homestretch here!  Those of you who follow me on Instagram got a little sneak peak yesterday at something that is starting to resemble jeans.

Today we are sewing the crotch curve and mock fly.  I don't really like that word crotch, but I can't really call it the lady business curve, or the down there curve.  Can I?

Our first order of business is to pin the crotch curve together.  What that means, is we want to take the two pieces that we now have, and pin them together at the seam that goes around the crotch.  This also encompasses the mock fly area.


Starting at the mock fly begin placing your pins through your two garment pieces.  As you can see in the picture above I made a little boo boo while I was cutting my fabric.  Fortunately, this nick in to the seam allowance is more shallow than the actual seam allowance.  Otherwise, I would have had to re-cut these pieces.


As we pin our way around the curve, we want to make sure that all of our notches are aligned.  I like to put pins at each of the notch points, or in the case of a double notch like the one above, I will just pin in between the two notches.  

Can I just talk about something off topic for a sec?  In every photo of my thumb, it looks like I have a dirty thumb nail.  I don't.  I don't know why it looks this way either, except that I have really deep nail beds that have a very dark red line between the pink and the white part of my nail.  But the rest of my nails don't seem to look that way.  Anyway, I just wanted to say something about it, because it really bothers me.


This photo is of the area where the two inseams come together through the curve.  I always push the seam allowances in opposite directions so that I am not sewing through 6 layers of material at this juncture.  I like to put my pin straight down through the two inseams so that when they are sewn they will line up nicely.


I forgot to take an up close shot, but I also made sure that the seam of the yoke lined up evenly so that it will match after sewing these two pieces together.

At this point we are ready to sew this seam.  You are going to want to use your lightning bolt stitch here because this is probably the most stretchy seam of the entire sew.  This seam is sewn with a 3/8 inch seam allowance. If you are like me and have paranoia about only having one line of stitching holding your arse in, go ahead and sew a second row of stitching at the 1/4 inch line of the seam allowance.

Once you have finished your yoke should look something like this.


Now can you read the word that is printed on this fabric?  Friends, I am going to have the word WASH all over my arse.  I have mixed emotions about this! Thing is, you really and truly don't see it in the print, but the camera lens picks it up like crazy!


 Hopefully the outside of your crotch curve seam looks something like this.  If you are new to sewing and your seams are off by a 1/4 inch or so, don't beat yourself up over it.  My best advice is that you have to think about lining things up where the seam allowance is instead of at the edge of the fabric.  Does that make sense?  Remember too, hopefully no one is going to be getting down and inspecting your crotch curve seam.  So unless you sit in a very un-ladylike manner, no one will ever see this seam.

Serger Sewists - IF that is a big capital IF, you are really comfortable with your serger this is a great seam to sew with it.  I would personally fold the mock fly back and start sewing at the start of the crotch curve that meets with the mock fly, and sew out to the yoke end.  Then, I would flip my garment and sew from where the mock fly meets the crotch curve up to the waist.  Unless you have mad serger skills, I WOULD NOT attempt to sew this as one long seam.  Only you know your limits, and you could mock this seam up on some practice fabric and see how you do.  Just remember once the knife cuts the fabric, there is no going back.

Now on to the mock fly.  The first thing that we want to do is mark the sewing line from the waist to the end of the fly curve.  You want this line to be parallel to the straight edge of the mock fly and to join to the stitch line for the rest of the crotch curve.


A good ruler and tailor's chalk are important tools for sewing.  A box of multi color tailor's chalk is relatively inexpensive and will last you for a very long time!


Once you have your line drawn, go ahead and pin the fly area together.  You don't want your fabric to shift while you are sewing this line.


Now, sew a straight line ending a few stitches in to where your chalk line meets the crotch curve.  I used a straight stitch here, because these stitches are not going in the direction of the stretch of my fabric.  I used a 2.5 stitch length, because I wanted a tighter/smaller stitch for this application.


Hopefully, in the picture above you can see that the stitching ends a few stitches in to the crotch curve seam.


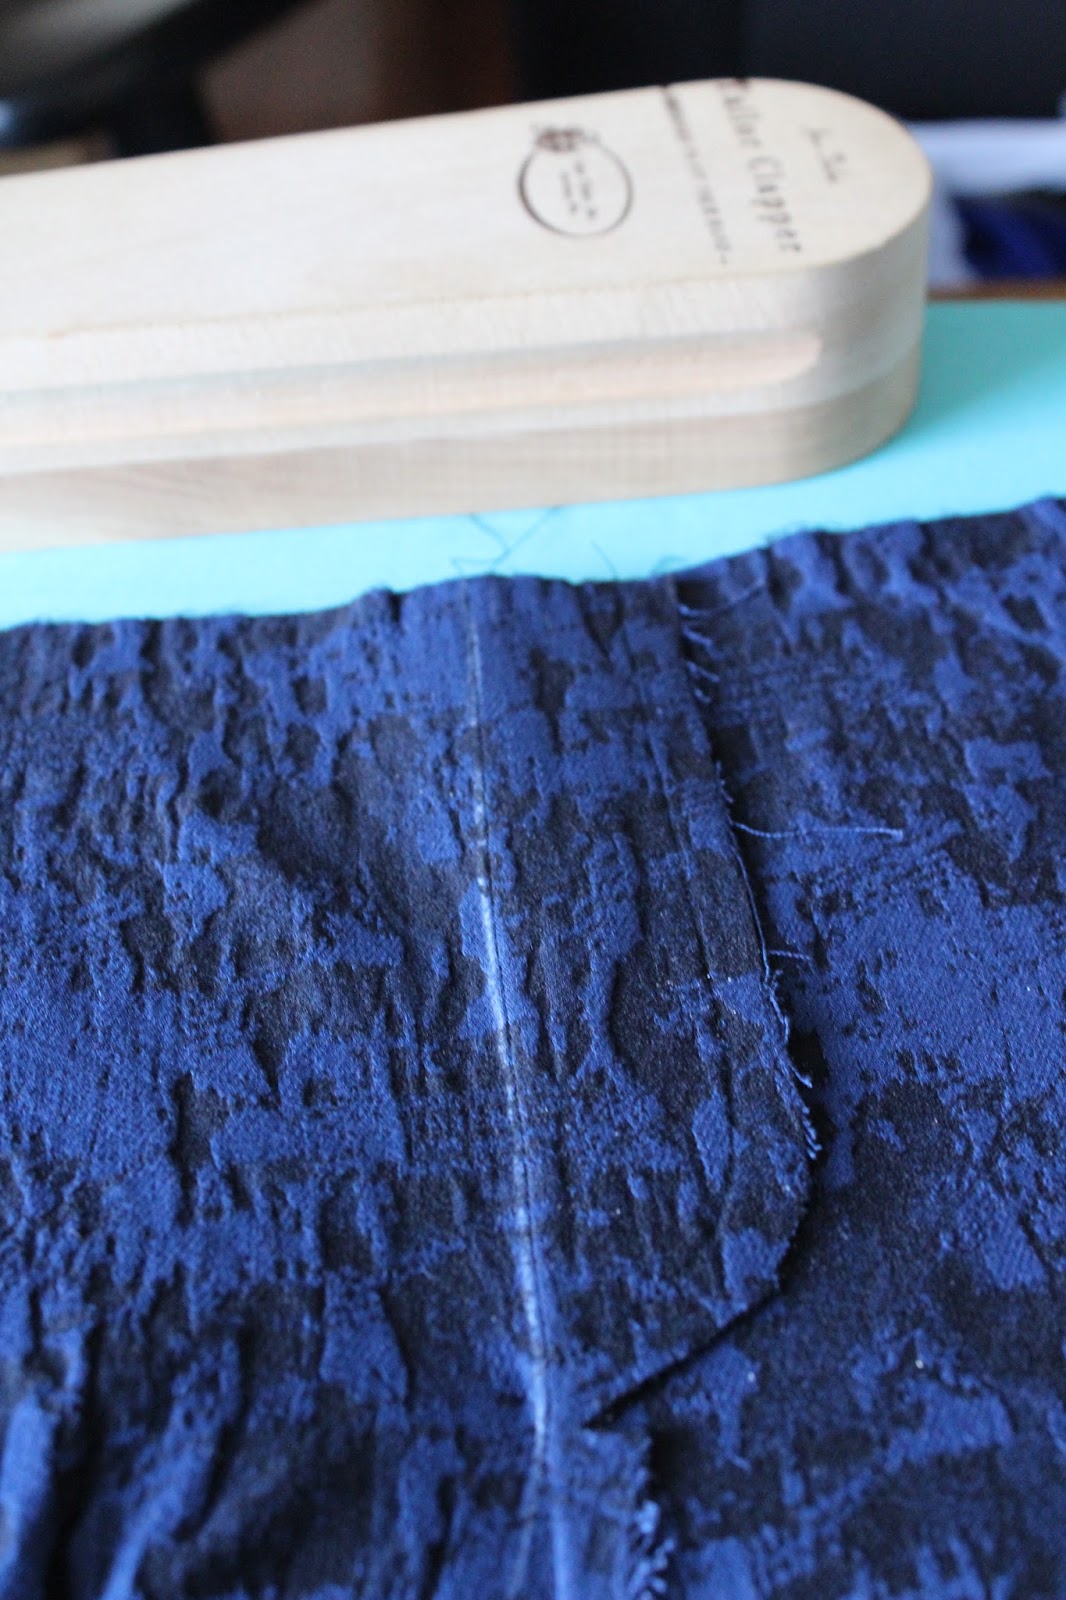
Now, with our mock fly spread open with the right side of the garment facing down, we want to press the mock fly towards the right.


Again, using our clapper here will help get a nice crisp seam, so if you have one, use it.  If you don't have one, might I suggest a heavy book.


Once the mock fly is pressed flat it will look something like this.  Is your fabric fraying like mine is?


When we flip the fabric over to the other side (the right side), you should have  a crisp seam.


So that we know where to stitch, you want to feel the edge of your mock fly through the fabric, and then use your chalk to mark along the edge.

Now let's put our double needle back in to our sewing machine.  The instructions did not call for a double needle here, but I like the continuity of it, and I like the way the double needle is going to catch the edge of the raw fabric.


I didn't pin the beginning of the seam here, but I did want to throw a couple of pins in to the curve, because that is where the fabric is most likely to shift.  I placed the stitch/chalk line, just to the right of my left twin needle.


Remember to stitch forward and back to anchor the seam, and then go ahead and sew all the way to edge of the mock fly, also ending with a reverse and forward stitch.  It may take a little practice to end your stitching right at the edge of the fly seam.  Don't worry about it.  Again, who is going to be down there inspecting your sewing prowess?


This is what the finished mock fly will look like from the front.  If you wanted to make this look even more like a real fly, you could add some top stitching down the straight seam of the fly, and even a bar tack.  Those are all design details you can decide about on your own.


This is what the back side of the mock fly looks like when sewn with the twin needle.  See how the raw edge is encased between the two rows of stitches?  That is why I chose to use the twin needle and used the alignment that I chose with the stitch/chalk line and the left needle.  Does it all make sense now?

That is all for this step, Friends.  I can't believe that this project is almost finished, can you?  Don't worry if you are running behind, because obviously I am too!  You are going to have until November 15th to get your Misty Jeans made if you want to try to get in on the prize action.


Tuesday, June 16, 2015

Pattern Review Butterick B6224 - The Plus Size Jumpsuit

Hello, Friends!  With the world going crazy for jumpsuits, I decided to jump on the bandwagon in search of a good pattern for my very round body.  I decided to try out Butterick B6224.  Here it is:

Horrible quality cell phone pic of B6224
Friends, let me tell you that this picture shows this jumpsuit in a much more flattering light than it actually is.  Apologies for the crumby cell phone pic.  It was after 9:15 last night when we finally got around to taking this pic, and truly I didn't feel this jumpsuit really deserved the DSLR treatment.

Now, let's talk about the changes that were made and the construction of B6224.  I decided on making the size 30 based on my waist and bust measurements.  The problem with this is that my 64 inch hips were not even close to the 54 inch hips this size calls for.  Because I needed the bodice and pant to be the same at the waist, I decided to use the slash and spread method to get the extra width needed in the hips.

Slash and Spread Method on B6224

I wanted to add two inches to each pattern piece for a total of eight inches added, knowing that I would also sew narrow seam allowances through the hips to make up for the rest of the difference.  I slashed a straight line down from the top of the pocket and a line across from the bottom of the pocket to the first slash, because the pocket was the anchoring part of this pattern piece.  I then used my flexible ruler to add the two inches needed, and moved the bottom hem allowance to it's proper location.

Front Pants Piece of B6224 After Grading to My Measurements
This is what the finished piece looked like after I made my changes for grading to my hip measurements.  I graded the back pant piece in the same method, but forgot to take pictures.  The paper I am using here was from a roll of velum that I got at the art supply store.  I really like this paper because it is wider than Swedish tracing paper.  The back pattern piece didn't quite fit on the Swedish tracing paper so I had to tape two pieces together, and I don't like having to do that.

Construction on B6224 was pretty straight forward.  I decided to actually follow the pattern directions as if I were a newbie sewist.  I only veered from the directions in two ways.


Interfaced Pieces for B6224

First, I trimmed my interfacing smaller than my pattern pieces.  Do you do this?  I remember reading in one of my sewing books that you should always do this, and now I always do.  It helps to cut down on bulk.  The second thing that I changed was the pattern has a tie at the waist band that is just for show.  I left that off, because I don't want to add anything extra in that area.


Pinning the Bodkin Inside the Casing for Stability on B6224

There was a lot of elastic to fish through the waist seam.  I used my trusty bodkin.  There were many times I had to put a pin through the head of the bodkin to hold it in place while I fiddled with the elastic and the casing trying to get the elastic to spread out evenly in the casing.  If I make this pattern again I will probably leave the elastic out and plan to wear the jumpsuit with a belt instead.

There are a few other things I will change if I decide to make this jumpsuit again.  The bodice is quite low cut in the v-neck.  I am not one to be overly modest, but this was a bit deep for me, so next time I would make the v-neck a bit more shallow.

This jumpsuit has a 22" zipper and a hook and eye closure in the back.  The thought of trying to get these undone in a public bathroom with no assistance from my hubby kind of scares me.  Next time I put the zipper in the front and use an exposed zipper!  I think that would be a nice design element.  My husband says just leave off the hook and eye and add a pull to the zipper to keep it in the back.  It isn't a bad idea and something I may have to do if I plan to wear this version outside the house.

Though my bust is a half inch smaller than the pattern calls for in the size 30, this needs a FBA.  You can see the drag lines beside the bust in the picture, but this pattern was almost uncomfortable in the bust.  Feels like it is smashing the bust flat like a sports bra does.  The dart is slightly too low for my bust and needs to move up about 3/4 of an inch.

I would take an inch out of the bodice in length, and add 3 inches to the pants/crotch curve in length.  I am pulling down on the pockets for a reason!  Also, the arm holes on this pattern are a bit tight.  This is not a problem I have ever had before with a pattern.  Generally pattern armholes are gaping open showing off my underthings.  The directions have you turn in a narrow hem for the arms to finish them off.  I think next time I would use bias binding, and this would help with the tightness there.

So Friends, what do you think?  Can a plus size gal wear a jumpsuit?  I personally believe curvy divas can wear whatever they want as long as they can get a good fit.

In case you are wondering the fabric I used is a 100% cotton quilt backing from Windham Fabrics that was in the fashion fabric section at my local Hancock.  At 108 inches wide and $4.95 a yard plus a percent off coupon, I grabbed up some yardage to use for wearable muslins.  It feels and behaves much like chambray but with a little more heft.